home home home

Tuesday, December 29, 2009

Bloomers and a Give Away!


I don't mind that little Miss is tall for her age. I do, however, mind it when that means her favorite dress (okay, let's be honest, my favorite dress) is quickly becoming inappropriate! Week after week, I'm finding this is the case with all of her dresses. So, in order to remedy this situation...I've decided to bring bloomers back. You heard me. Little house on the prairie, your great granny used to wear, old school bloomers...and I love them!

I'm thinking that there are a lot of other mothers out there in the same situation, so I'm thinking about making this into a give away! Leave a comment if you want me to make your little girl a pair of bloomers, or if you know of anybody who needs them for their little girl. Think about it...no more embarrassing can-can moments at church!

Saturday, December 26, 2009

Drumroll Please!!

{drawn out of a bag by my 3 year old daughter}

Sarah!!

I'll stop by your house sometime this week with all 3 so you can pick your favorite one!

Thanks for playing everybody! I'll have a new drawing tomorrow!

Thursday, December 24, 2009

Merry Christmas


Lullaby, lullaby, my little one.
Lullaby, my child so dear.
Thy precious life has just begun
Thy mother holds thee near.

While Joseph watches through the night,
A star reflects thy radiant light.
Lullaby, lullaby, my little one.
Lullaby, my child so dear.

Thy gentle head shall wear a crown,
For thy father is the King.
Thy tender hands so tiny now,
Have blessings great to bring.

Let all creation join my song,
For peace and love this night are born.
Lullaby, lullaby, my little one.
Lullaby, my child so dear.

May we all remember the true meaning of Christmas.
[christmas2+082.JPG]

Wednesday, December 23, 2009

Sweet Feet

http://www.oldfashionedpretty.com/wp-content/uploads/2009/09/fashionflowershoesflowersheelshighheels-a4e5fe5a65229d5003ac4cd4cce5cfe4_h.jpg
*sigh*...I love these shoes. I'm not really sure if anybody could pull them off in real life
{but I think I may be willing to try}

Tuesday, December 22, 2009

Give Away!


The problem with shopping for other people, is that you inevitably end up finding things that you want as well (and no, contrary to the cute sign posted above the register, your husband didn't call, and he most certainly didn't tell you to buy whatever you want). So, as a reward for your remarkable willpower, I've decided that it's time for a give away!!

You have 3 choices
of "Writing on the Wall" vinyl lettering. The quotes are in black with matte beige words behind them. The first one is 14"x3", the other two are 24"x3".
{I tried to match the fonts, but they are a little different}
.

Leave a comment (even if it doesn't say anything..I understand not knowing what to say). If you post about it on your blog, that is worth TWO entries. So, if you write a comment and make a post on your blog, then that counts as 3 entries.
The winner will be announced December 26th. Good luck, and keep up the good work Santa...er I mean ladies!

Monday, December 21, 2009

Window Shopping

Photobucket
Sweater: Wet Seal $22.50
Sequined Cami: Wet Seal $7.50
Skirt: Anthroplogie $88.00
Heels: Mod Retro $39.99
Hair Flower: Designer Blvd {Queen Creek and Higley} $9.50

There is a shopping itch that I get every now and again. I don't think my dear husband has ever experienced this, and so he is completely unsympathetic. So, for now..*sigh*..I'll just have to go window shopping. Here is what I would get, if I could. The cost isn't bad AND it's modest. The hair flower is mine (my daughter is modeling). I just purchased it at one of my favorite stores: Designer Blvd. It's over on Queen Creek and Higley ( kitty corner to Lowe's). I'll be having a give away from there soon...so stay tuned!!

Friday, December 18, 2009

Good Times

{quote from transparent mama}
This is what life looks like when you have your cake and eat it too.

For Where Your Treasure is...

http://images.homeplans.com/plan/www_fcpv_jpg/3157.jpg
Some day I will have a beautiful house. It will probably be in an inviting craftsman style with windows that give off a warm glow and an wrap around porch that sends out a whisper of "Welcome home". I will be able to pour out generous amounts of money in order to keep this house filled with my treasures and bits of bliss.
But as of right now, my treasure lies hidden in the fingerprint smudges that grace my computer keyboard {without my little ones, said fingerprints wouldn't be there-so all of the little reminders make my heart sing...well, most of them anyway}. I find happiness in the shrieks of delight from a tiny one year old as he slobbers on the sliding glass door, trying to give his puppy kisses. Granted, I have my tiny touches of bliss here and there that I can afford right now {not just monetarily speaking, of course, but I can only grant a minimal amount of time to indulge my crafty cravings}. I see things. I want things. But all that needs to be done to rectify this is to turn and look at my daughter's smiling face {cracking her self up with her own nonsensical jokes} and I come to the realization that having a choice, I would much rather be wearing my princess tiara while my little miss graces the stage {an overturned laundry basket- obviously laundry isn't taking precedence} belting out made up songs on her pretend pink guitar. I am her captive audience {her devoted groupie}. As for now, I will relish in tickle fights and I will be content with daydreaming of scrapbook paper, ribbon, and all things floral.
BUT I will have an awesome Christmas centerpiece...so stay tuned!

Monday, December 14, 2009

Paper Roses


Imagine making these roses with fun polkadot paper, or distressed music sheets. Then varnishing them and using them in jewelry, hair bows, or on picture frames!! How fun! I am totally going to be making these in the next few days...or perhaps after Christmas. But for now, here are a couple of tutorials for you:
Rose Tutorial 1
Paper Rose2

Friday, December 4, 2009

It's Time For a Gift!!

{the picture is mod podged then varnished onto a 2.5x3.5 piece of thin wood, and I must admit...I love it!}

So far this month has been C-R-A-Z-Y busy! I don't mind, but it means I've been neglecting my poor blog. Well, to officially kick of the Christmas season I am going to give away a personalized ornament to everybody who leaves a comment {If you want to become a "follower" that would be great!}!! All I ask is that you please make a post on your own blog about the give away {if you have one, that is}.

Send your favorite picture, a quote or saying to go with it, and your address to:
touchesofbliss@gmail.com

Merry Christmas!

Photobucket

Thursday, November 26, 2009

Happy Thanksgiving!

{glass from sconces, picture frame, pumpkin....left over from Halloween}

I have so much to be thankful for, remember the little things. But today I'm giving thanks for the most precious and loved thing in my life. My children.


*Just for this morning, I am going to step over the laundry, and pick you up and take you to the park to play.

*Just for this morning, I will leave the dishes in the sink, and let you teach me how to put that puzzle of yours together.

*Just for this afternoon, I will unplug the telephone and keep the computer off, and sit with you in the backyard and blow bubbles.

*Just for this afternoon, I will not yell once, not even a tiny grumble when you scream and whine for the ice cream truck and I will buy you one if he comes by.

*Just for this afternoon, I won't worry about what you are going to be when you grow up, or second guess every decision I have made where you are concerned.

*Just for this afternoon, I will let you help me bake cookies, and I won't stand over you trying to fix them.

*Just for this afternoon, I will take us to McDonald's and buy us both a Happy Meal so you can have both toys.

*Just for this evening, I will hold you in my arms and tell you a story about how you were born and how much I love you.

*Just for this evening, I will let you splash in the tub and not get angry.

*Just for this evening, I will let you stay up late while we sit on the porch and count all the stars.

*Just for this evening, I will snuggle beside you for hours, and miss my favorite TV shows.

*Just for this evening when I run my finger through your hair as you pray, I will simply be grateful that God has given me the greatest gift ever given.

*I will think about the mothers And fathers who
are searching for their missing children, the mothers and fathers who are visiting their children's graves instead of
their bedrooms, and mothers and fathers who are in hospital rooms watching their children suffer senselessly, and screaming inside that they can't handle it anymore.

*And when I kiss you good night I will hold you a little tighter, a little longer.. It is then, that I will thank God for you, and ask Him for nothing, except one more day.............

Friday, November 20, 2009

The Best Dog-gone Party Ever!


I don't know about you, but when I think of a birthday party for a three year old little girl, visions of princesses and Tinkerbell run through my mind...not puppies. However, when given the choice, my little girl wanted a "doggie party". So this is what I did:

Lil smokies hotdogs (served in dog dishes) for dinner
then we watched 101 Dalmations while we munched on dog kibble {muddie buddies mixed with reeses puffs} and dog bones {Pillsbury cinnamon twists- put a knot on each end to make it look like a dog bone}
For her cake we had cupcakes with dog faces- yellow m&m, grasshopper for eyes
fudge graham ears
whopper nose (I used a reese's puff)
http://images.meredith.com/fitness/images/2008/04/ss_46KeeblerRightBites.jpghttp://i.walmartimages.com/i/p/00/03/01/00/38/0003010038387_215X215.jpg

This was a party just for our little family, but you could play some fun games like:
*cat, cat, DOG.
*Red Rover
*Feed the dog (turn a cardboard box into a dog, cut a hole where the mouth is, then have the children take turns throwing bean bags).
*If you have the cash, you could buy each child a puppy and put it in the "pound", have them pick out their puppy , making a certificate of adoption for each dog, then set up a vet station and a grooming station.

Then end the party by having the kids bark the "Happy Birthday" song to the birthday girl/boy! Don't forget about the Doggie Bags (filled with dog stickers, a ball, dog whistle, etc.)!

Wednesday, November 18, 2009

Etsy Find

http://ny-image1.etsy.com//il_fullxfull.103369221.jpg
My friend, Lexi, showed me these really cute blocks on Etsy. I have to say that I think that they would make a perfect Christmas gift for grandma!!Don't want to spend the mula? Then make them! Just paint some wooden blocks (you can also go to home depot, get a 2x4 then cut them to size), Mod Podge the pictures onto blocks (let it dry), place vinyl lettering on top (making sure not to cover the faces!), then distress the edges (you can use an ink pad). Don't know anybody who does vinyl lettering? Then you can buy alphabet rub-ons (in the scrapbook section of Michael's or Joann), or you can buy stamps and emboss the letters on.
http://www.ebbcreations.com/catalog/images/mod%20podge%20matte.jpg

Thursday, November 12, 2009

Cake Ball Recipe

http://www.familycorner.com/jpg2/pumpcakeballbig.jpg
Watch out cupcakes, there's a new cake in town! These fun little treats are perfect for every occasion. They are incredibly easy and you can change them up to suit any occasion. Halloween-chocolate cake mixed with chocolate frosting, dipped in orange confectioner's coating , put a pretzel stick in and add some green frosting leaves and you've got a pumpkin! Baby shower- strawberry cake mixed with cream cheese frosting, dipped in pink confectioner's coating. Or chocolate cake mixed with chocolate frosting dipped in blue. Christmas- red velvet cake mixed with cream cheese frosting, dipped in green confectioner's coating. The list goes on and on!

{click on recipe card to print out and add to your collection!}
Photobucket

Sunday, November 1, 2009

Before & After

I know times are lean for lots of people right now...but that doesn't mean we don't want nice things anymore, it just means we can't have them right now. That's a bummer! But it's life...so... I'm always looking for ways to make my house cute on my budget so that I can take part in the fun now. Bad? Probably. So...unless you are willing to purchase new things on credit {which I don't recommend & have never done} sometimes the only options are to do it yourself or go without. I wanted to do this little post to {1st} show you an example of how you can have nice things with just a tiny bit of $ and {2nd} show you how to do it for yourself if times are lean {and even if they're not}.

If there's one thing I really enjoy, it's re-doing furniture. I love filling my home with cute things, especially cute things I made! That feeling just doesn't compare to purchasing something new! {Don't get me wrong..I LOVE new furniture, too!} My hubby just has to deal with our overflowing garage full of "projects" yet to be done...poor guy....but not really when you think about how much moolah {$} I save him! I know girls, you can go broke on good deals...but seriously...with furniture--this project was a GOOD DEAL!! Whenever you have the opportunity to receive furniture for little or nothing--take it! There's always something that can be done with it. {well, I take that back...sometimes there's not..and sometimes there's no place to put it...} But don't pass up a chance to even just "drive by" that yardsale....you never know what you might see....

Anyways, this is from back in August when it was 110 degrees outside. There was a house being built behind us so all of the workers could see into our backyard where I spent the mornings doing this piece. Other than that, I did it entirely alone. It was that easy!

Here's the furniture before: {it's in my mom's friend's garage}


It's really not my style, but I thought since it was pretty much free I would try my hand in re-doing it to try & fit my house...

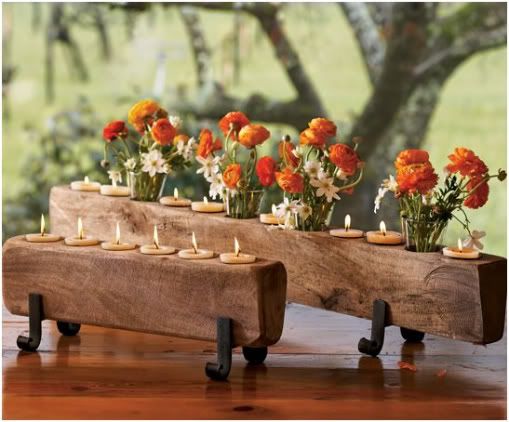
Here's my inspiration:


This is a page from the Country Sampler Magazine. I saw this piece a few months before & loved it. I have a thing for that color of green. I think black furniture looks soooo good up against it.
I remembered how much I liked it and thought I could do something sort-of like it with my new found stuff.

Here's the after:


Here's how I did it:


I am in no way a professional. I've refinished some really UGLY things. Just ask my husband. I'm not patient and I have a hard time waiting for paint to dry! I want to do projects that only take an hour. Put the baby to bed, a movie on for the kids and go to work. Never does anything take me an hour....it takes me days. I have high hopes of getting things finished quickly....but being patient is the key. Easier said that done, I know.

This project took me 3 days.

I started by taking off the tack-paper all over the inside of it. I HATE hot weather, but thanks to that heat the tack-paper came off super quick. {The furniture had white tack-paper all over the inside}. I then wiped it down to see how much I needed to sand it. I also dislike sanding things. Takes SO MUCH TIME! But I did sand this baby down. Really good, and too good in a couple of places where the wood veneer was thin. Oops.

I sanded it with a little electric mouse sander with a fine sandpaper. I didn't want to rough it up too much.

Oh...I tore off the top thingy. I have NO idea what those are called, you know..the little curly things on top in the "before" picture. Not a fan of those babies. At all.

I painted it with a sponge brush. I don't know if that's what professionals use, but that's what I used. It's all I had. This went on super smooth, but needed a couple coats. Good thing about this paint....I didn't have to put on a top coat. Yay...less time to wait for paint to dry. I purchased it at Home Depot, but Lowes has it too. Don't look at Walmart..it's not there..

When it was finished and dry, I made my husband drag it in for me. I put the hardware back on inside. I also put the doors back on. {Yes, I actually took them off...usualy I would try to figure out a way to keep them on, but I wanted it to look good and took them off.} Then I sanded the edges. I should have done this step outside--black paint dust everywhere....but, lucky for me the finish underneath was still a little redish! When I sanded it the red shown through. I've found with painting my signs that I can achieve this look with all finishes, all I needed to do was use a little bit of a stain. You can get wood stain in little tins from Walmart.
I love the way it turned out. I put out all my Fall decorations in it. Its funny because this project seriously only cost me about $8. That's how much the paint was. I kept all the hardware. The only crappy thing about the whole project was how HOT it was outside when I did it. Oh well.


Photobucket

Tuesday, October 27, 2009

Thanksgiving Centerpieces

Here's a couple ideas to spark your creativity and make your Thanksgiving a beautiful one! Don't have this gorgeous yet rustic candle holder? Try using glass vases (varying sizes-from all of the flowers I'm sure your hubby has bought you through out the years), put some nuts at the bottom, then place the candles on top. Next, put some flowers in small vases and alternate the candles and flowers in a haphazard row on the table.

Thursday, October 15, 2009

Spooky Chic


Break out the cider and the hot cocoa. Unpack your sweaters. {and crank up the AC}. It's Fall! Okay, here in AZ we've got quite a long way to go before it starts getting cool outside {but a girl can dream, right?}. I've decided that I'm done with summer and it's time to start putting up all of my Halloween Decor! I LOVE, love, LoVe, Halloween. Seriously. I get to dress up, people actually give me candy, and supposedly it starts cooling off! What's not to love?

{if you like this look: I got the frame at Ross for $8, painted it orange. I covered the candle with scrapbook paper, ribbon, feather boa, and a rhinestone brooch from Joanne's. The "BOO" I got from Hobby Lobby (they're in the decor section, part of the full alphabet)}

Sunday, October 11, 2009

Boo Blocks

Jill made these really cute blocks for me!
To make these cute blocks, she first cut the wood to the size and painted them black. Then she used vinyl as a stencil by putting it on, painting over it with the orange, and then peeled the letters off. Lastly, she distressed them with black paint and a wet rag (rub it on, then quickly rub most of it off).